⚠️ This article is outdated and discontinued since Heroku decided to no longer offer their free tiers as this article series suggests to use in August, 2022. Please see this post for details. ⚠️
In the previous part of this series, I tried to explain the differences in the two modes a Telegram bot supports: pull (getUpdates) and push (Webhook) methods. I also explained what a webhook is and how to easily giving it a test-drive, without any hassle.
Today we will talk about what Heroku is and about how to prepare your workstation to effectively work with that platform.
If you do not like Heroku or if you simply want to use another hosting service for your bot like AWS, OpenShift, Google Cloud Platform, whatever for any reason: That is perfectly OK and you can do so! I will write this and the next article on Heroku in a way that even when you decide to skip it completely, you won’t miss anything from this Telegram/Python/Django article series but the presentation of how to get the bot hosted on Heroku.
The only thing which you won’t be able to follow 1:1 in the upcoming parts of this series is that you can’t use those commands to trigger new deployments to the hosting platform with or do some minor, hosting platform related steps. But if you are advanced and familiar enough with deploying web applications to have a better idea of hosting an application than me, this shouldn’t be much of a problem for you, since most commands for Heroku are pretty straightforward and easy to adapt for a different system.
What is Heroku and why do you advertise it here?

Heroku describes itself like this:
Heroku is a cloud platform that lets companies build, deliver, monitor and scale apps — we’re the fastest way to go from idea to URL, bypassing all those infrastructure headaches.
And yes: This is what they do! They are offering privates, entrepreneurs or even large enterprises a great platform to life-cycle, host and scale their applications.
This describes pretty much all cloud-based services out there nowadays, so again: Why Heroku?
Having tried some classical and recent services already, my experiences, in a nutshell, are like this:
Heroku offers an awesome and unmet level of features, low learning curve, cost-effectiveness and a great user experience. I’m absolutely in love with this platform and every time I’m working with it, it feels like “agile cloud-based software life-cycle platform done right“. To me, it gives a feeling of putting the often utilized term of cloud-computing to an actual use, without over-complicating the setup and gory details too much for someone who is not really interested in what is ticking under the hood.
I’m in no way related to Heroku! I do not work for them, I do not receive any advertising money to write about them, nor did they grab my first-born to force me to do advertisements for them.
I’m just convinced by it. And since their service and hosting is for free for a project of the scope of a Telegram bot like we are up to create in this article series, this finally makes it the perfect choice for this article series! ? Plus, it offers already HTTPS termination out-of-the-box, which is important for a Telegram bot.
OK, let’s give it a try then ?
Hooked? Great!
To get yourself started, you need to sign up for a free account on Heroku first. Just with most services, you will be asked for the common details: Email, Name, I’m not a robot, et cetera. After you have done that and confirmed your Email and so on, you can log in and you will be redirected to the dashboard, which is an overview of all your projects. Not very surprisingly, this will be empty.
But the fact that you can log in to the Dashboard successfully proves that everything is good to go!
Next, install the Heroku CLI. Heroku CLI is a command line interface which lets you manage and control your Heroku apps from the local command line and lets you do a lot of cool stuff; you can’t fully utilize the power of Heroku without it.
To install it, follow the instructions for your operating system from https://devcenter.heroku.com/articles/heroku-cli. As soon as the following command works on your system, you are all set up and good to continue reading this article:
~ $ heroku version
heroku/7.9.3 linux-x64 node-v10.9.0
~ $
A bit of terminology and concept
In Heroku lingua, the containers one can deploy to fulfill the typical container abstracted tasks are called “dynos“. Just with any container-centric platform nowadays, there can be different types of dynos like for example web, application, etc. Each one can be of different levels of performance, available RAM, can be scaled horizontally (concurrent dynos) and so on.
By default, everyone is on the “free” plan (for an overview of available plans, see pricing table). Without adding a credit card to charge for eventual costs, a free plan includes 550 “free dyno hours“. A dyno hour is a cost management entity which is consumed by active dynos. One dyno hour can be consumed by having one active dyno for one hour or two active dynos for 30 minutes, and so on. Whenever one of the following conditions matches, dyno hours are consumed:
- There is a web dyno that is receiving traffic.
- If a worker dyno is running without a web dyno.
- A one-off dyno is running. (More on “one-off dynos” later or you read the Heroku article about it).
One month has up to 744 hours (31 * 24). If you are deciding not to register a payment method and go with the 550 free dyno hours, you should be fine to operate a bot 24/7 every month, anyways.
… is he stupid or what? 550 < 744 !
Yes, you are correct, that seems to not make much sense at first! But to keep an app up and running 24/7 on Heroku does not necessarily mean that the same amount of dyno hours is consumed:
The free plan lets you launch free web dynos. If a web dyno receives no traffic for 30 minutes (thus: No message is sent to and forwarded to the webhook by your bot), that web dyno will “fall asleep”. This can’t be compared to a standby- or hibernate mode of virtual machines: Dynos which are asleep will still answer and react to any request which is sent to them since the socket stays open and is listened to, but if a request is received, there will be a short delay (~30 seconds) during which the dynos are re-activated in the background automatically and stay up for another 30 minutes before it will fall asleep again. Sleeping dynos are not consuming any dyno hours. This way my personal bot (which is in active use by two people) usually does not consume more than 50 dyno hours of the 1000 free dyno hours per month (I have added payment details) even though it is available 24/7.
So: If you have either the need for immediate reaction of your dynos without a delay of ~30 seconds ever, you will need to upgrade your plan to the “hobby” plan ($7 per dyno/month). If you can live with this delay for each first request in a 30 minute time frame (the subsequent requests will not have this delay) and do not keep it active 24/7 really, you do not only not need to upgrade your plan but you should not even need those additional 450 dyno hours by adding payment details as well and should even have enough dyno hours spare to add several additional projects to your account.
Authenticate your CLI to your Heroku account
By now, you should already have an activated Heroku account and the Heroku CLI installed on your workstation.
Now, we will authenticate the CLI to the platform, using your account. This enables you to fully get rid of the Web-based dashboard for most things and only operate on clear, reproducible command line segments. Even though the web browser and the web-based dashboard is not needed from this point onwards anymore, I still recommend to browse it and investigate the results of your command line actions, just to get a better idea about what you really did and trigger with it, since often looking at the fine polished web GUI is less abstract and more easy to understand for some people.
To login to your account, run the following command:
~ $ heroku login
heroku: Enter your login credentials
Email: ****@marc-richter.info
Password: **********************
Logged in as ****@marc-richter.info
~ $
This registers a new API token in your Heroku account (see https://dashboard.heroku.com/account) and add that token to your ~/.netrc file.
That’s it! You can now start using heroku command to control your apps!
For additional details on the Heroku CLI Authentication, please consult the Heroku article on authentication.
Prepare a new dummy project folder to hold your future- and first code
We do not have any code yet, do we? Let’s create a new folder to hold our future application at ~/tbot and change into it. If you prefer another location, feel free to do so, but please adopt that in the following occurrences of ~/tbot accordingly.
Let’s initialize a Git repository in it already, since heroku command can add it’s remote repository URL to it then automatically and save us this manual step:
~/tbot $ git init
Initialized empty Git repository in /home/testuser/tbot/.git/
~/tbot $
I decided to give an example of this using Flask since it is a bit more lightweight for this minimal Hello World! – application I’m about to show here and I will not accidentally share something Django related which I either miss to repeat for those who decided to skip this Heroku-part, nor create duplicated content.
In this empty folder, we will start to create a Flask based application as if Heroku was not involved. Just do your usual stuff. Maybe create a virtualenv for it, install modules you need, etc. :
~/tbot $ mkvirtualenv -p python3.6 .
Running virtualenv with interpreter /usr/bin/python3.6
...
(tbot) ~/tbot $ pip install flask
Collecting flask
...
Successfully installed Jinja2-2.10 MarkupSafe-1.0 Werkzeug-0.14.1 click-6.7 flask-1.0.2 itsdangerous-0.24
(tbot) ~/tbot $
Create a “Hello World!” Flask-app ??
Let’s keep this easy and just take the official Flask-minimal example for this:
from flask import Flask
app = Flask(__name__)

@app.route('/')
def hello_world():
    return 'Hello, World!'
Save this to the file hello.py .
Next, let’s give this a local try:
(tbot) ~/tbot $ export FLASK_APP=hello.py
(tbot) ~/tbot $ flask run
 * Serving Flask app "hello.py"
 * Environment: production
   WARNING: Do not use the development server in a production environment.
   Use a production WSGI server instead.
 * Debug mode: off
 * Running on http://127.0.0.1:5000/ (Press CTRL+C to quit)
When you navigate your browser to http://127.0.0.1:5000/ , you should see “Hello, World!” in it.
If this works, we can start to prepare a deployment to Heroku for it.
Create an app on Heroku
To deploy any code to Heroku, we need to create an app for that. To do so, we will use the freshly authenticated Heroku CLI. To have your app created successfully, it needs a name which is exclusive in whole Heroku. Something generic like “telegram-bot” will most certainly fail, though. If you are not distracted from a cryptic name, just skip the optional name parameter:
~ $ heroku create
Creating app... done, ⬢ nameless-garden-54450
https://nameless-garden-54450.herokuapp.com/ | https://git.heroku.com/nameless-garden-54450.git
~ $
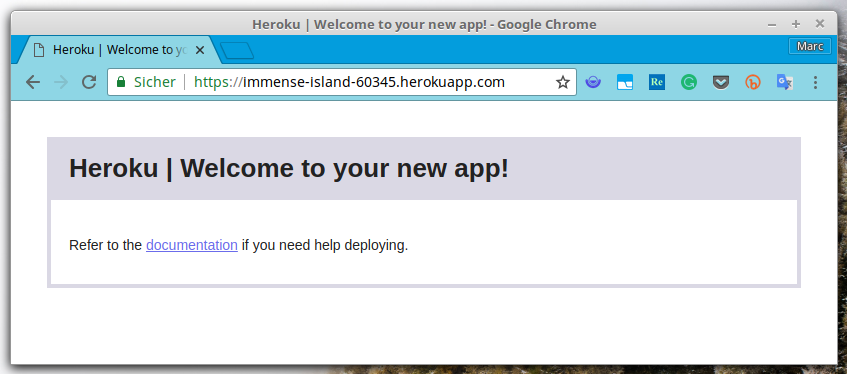
As you can see in this example, a random name is generated for your app if you do not provide a name for it. In this case, my app received the name nameless-garden-54450.
Another interesting thing in this output: A SSL terminated URL was registered (https://nameless-garden-54450.herokuapp.com/) and a Git repository was created (https://git.heroku.com/nameless-garden-54450.git) for the new app automatically. Both can be visited or used immediately. The app URL will show a dummy page until you add the first content to your app:
This should also have added a new remote to your Git repository, called heroku, pointing to the Heroku hosted Git repo for your app:
(tbot) ~/tbot $ git remote -v
heroku  https://git.heroku.com/nameless-garden-54450.git (fetch)
heroku  https://git.heroku.com/nameless-garden-54450.git (push)
(tbot) ~/tbot $
Prepare your deployment
We will provide our app with gunicorn. Let’s install that, first. After that, create a requirements.txt – file with your current module list, since this is one of the expected files for Heroku Python buildpack:
(tbot) ~/tbot $ pip install gunicorn
Collecting gunicorn
  Downloading https://files.pythonhosted.org/packages/8c/da/b8dd8deb741bff556db53902d4706774c8e1e67265f69528c14c003644e6/gunicorn-19.9.0-py2.py3-none-any.whl (112kB)
    100% |████████████████████████████████| 122kB 3.4MB/s
Installing collected packages: gunicorn
Successfully installed gunicorn-19.9.0
(tbot) ~/tbot $ pip freeze > requirements.txt
(tbot) ~/tbot $
Again, let’s test that locally first:
(tbot) ~/tbot $ gunicorn hello:app
[2018-08-22 13:45:40 +0000] [12046] [INFO] Starting gunicorn 19.9.0
[2018-08-22 13:45:40 +0000] [12046] [INFO] Listening at: http://127.0.0.1:8000 (12046)
[2018-08-22 13:45:40 +0000] [12046] [INFO] Using worker: sync
[2018-08-22 13:45:40 +0000] [12050] [INFO] Booting worker with pid: 12050
Sweet! This works also.
Next, we need to create a Procfile . This is a simple file which tells Heroku how to launch your app. For our simple example, we just need the following line:
web: gunicorn hello:app
web: is defining the process type of the dyno, which should launch the following command (gunicorn hello.app). The web type is the only process type that can receive external HTTP traffic, so this part of the only line of this file is settled by this already.
gunicorn hello:app is the command part of the line, the dyno created for this web process type should execute. When you are in your local project folder ~/tbot and have your optionally created virtualenv activated, executing this 1:1 should result in launching a web server as well, providing your application locally. Heroku is doing nothing different. It simply executes this part in each new dyno spawned to provide this environment. hello.app defines to reference the object app from the file hello.py. Just with any module in Python, the suffix .py is removed.
Checkout gunicorn’s docs if you do not understand what happens here.
To learn more about this file, please check out the official Heroku article about this topic.
Once this file was created, let’s test it one last time locally, before we deploy it to Heroku. This time, we will utilize heroku local command. This starts your app locally, just like it will be done remotely once we have deployed it:
(tbot) ~/tbot $ heroku local
[WARN] No ENV file found
13:50:24 web.1   |  [2018-08-22 13:50:24 +0000] [12386] [INFO] Starting gunicorn 19.9.0
13:50:24 web.1   |  [2018-08-22 13:50:24 +0000] [12386] [INFO] Listening at: http://0.0.0.0:5000 (12386)
13:50:24 web.1   |  [2018-08-22 13:50:24 +0000] [12386] [INFO] Using worker: sync
13:50:24 web.1   |  [2018-08-22 13:50:24 +0000] [12390] [INFO] Booting worker with pid: 12390
If this is also working, you should be ready to deploy!
Let’s do one last, optional step: To prevent the .pyc – files to be added to the repo, let’s create a .gitignore – file for these before we start to add or commit anything:
echo ‘*.pyc’ > .gitignore
Ship it! ?
If you followed all the previous steps, your project folder should look similar to this by now:
(tbot) ~/tbot $ ls -1a
.
..
.git
.gitignore
hello.py
hello.pyc
Procfile
requirements.txt
(tbot) ~/tbot $
You can now add and commit these files to your Git repository:
(tbot) ~/tbot $ git status
On branch master
Changes not staged for commit:
  (use "git add <file>..." to update what will be committed)
  (use "git checkout -- <file>..." to discard changes in working directory)

    modified:   .gitignore
    modified:   Procfile
    modified:   hello.py
    modified:   requirements.txt

no changes added to commit (use "git add" and/or "git commit -a")
(tbot) ~/tbot $ git add .
(tbot) ~/tbot $ git commit -m "Init"
[master 8dd2ecb] Init
 4 files changed, 1 insertion(+), 3 deletions(-)
(tbot) ~/tbot $
To deploy everything to Heroku, you are using Git pushes. That’s it! From now on, you can already forget about any hosting details and simply focus on programming.
To deploy this “Hello World!” – application, you need to push your commits to the “heroku” Git remote, which got added during app creation, automatically. You will see a build- and deployment-output while your app is prepared:
(tbot) ~/tbot $ git push heroku master
Zähle Objekte: 9, Fertig.
Delta compression using up to 4 threads.
Komprimiere Objekte: 100% (7/7), Fertig.
Schreibe Objekte: 100% (9/9), 819 bytes | 0 bytes/s, Fertig.
Total 9 (delta 2), reused 0 (delta 0)
remote: Compressing source files... done.
remote: Building source:
remote:
remote: -----> Python app detected
remote: -----> Installing python-3.6.6
remote: -----> Installing pip
remote: -----> Installing SQLite3
remote: -----> Installing requirements with pip
remote:        Collecting click==6.7 (from -r /tmp/build_8da096c58d0ca30c079c4642ebdd08fb/requirements.txt (line 1))
remote:          Downloading https://files.pythonhosted.org/packages/34/c1/8806f99713ddb993c5366c362b2f908f18269f8d792aff1abfd700775a77/click-6.7-py2.py3-none-any.whl (71kB)
remote:        Collecting Flask==1.0.2 (from -r /tmp/build_8da096c58d0ca30c079c4642ebdd08fb/requirements.txt (line 2))
remote:          Downloading https://files.pythonhosted.org/packages/7f/e7/08578774ed4536d3242b14dacb4696386634607af824ea997202cd0edb4b/Flask-1.0.2-py2.py3-none-any.whl (91kB)
remote:        Collecting gunicorn==19.9.0 (from -r /tmp/build_8da096c58d0ca30c079c4642ebdd08fb/requirements.txt (line 3))
remote:          Downloading https://files.pythonhosted.org/packages/8c/da/b8dd8deb741bff556db53902d4706774c8e1e67265f69528c14c003644e6/gunicorn-19.9.0-py2.py3-none-any.whl (112kB)
remote:        Collecting itsdangerous==0.24 (from -r /tmp/build_8da096c58d0ca30c079c4642ebdd08fb/requirements.txt (line 4))
remote:          Downloading https://files.pythonhosted.org/packages/dc/b4/a60bcdba945c00f6d608d8975131ab3f25b22f2bcfe1dab221165194b2d4/itsdangerous-0.24.tar.gz (46kB)
remote:        Collecting Jinja2==2.10 (from -r /tmp/build_8da096c58d0ca30c079c4642ebdd08fb/requirements.txt (line 5))
remote:          Downloading https://files.pythonhosted.org/packages/7f/ff/ae64bacdfc95f27a016a7bed8e8686763ba4d277a78ca76f32659220a731/Jinja2-2.10-py2.py3-none-any.whl (126kB)
remote:        Collecting MarkupSafe==1.0 (from -r /tmp/build_8da096c58d0ca30c079c4642ebdd08fb/requirements.txt (line 6))
remote:          Downloading https://files.pythonhosted.org/packages/4d/de/32d741db316d8fdb7680822dd37001ef7a448255de9699ab4bfcbdf4172b/MarkupSafe-1.0.tar.gz
remote:        Collecting Werkzeug==0.14.1 (from -r /tmp/build_8da096c58d0ca30c079c4642ebdd08fb/requirements.txt (line 7))
remote:          Downloading https://files.pythonhosted.org/packages/20/c4/12e3e56473e52375aa29c4764e70d1b8f3efa6682bef8d0aae04fe335243/Werkzeug-0.14.1-py2.py3-none-any.whl (322kB)
remote:        Installing collected packages: click, Werkzeug, MarkupSafe, Jinja2, itsdangerous, Flask, gunicorn
remote:          Running setup.py install for MarkupSafe: started
remote:            Running setup.py install for MarkupSafe: finished with status 'done'
remote:          Running setup.py install for itsdangerous: started
remote:            Running setup.py install for itsdangerous: finished with status 'done'
remote:        Successfully installed Flask-1.0.2 Jinja2-2.10 MarkupSafe-1.0 Werkzeug-0.14.1 click-6.7 gunicorn-19.9.0 itsdangerous-0.24
remote:
remote: -----> Discovering process types
remote:        Procfile declares types -> web
remote:
remote: -----> Compressing...
remote:        Done: 42M
remote: -----> Launching...
remote:        Released v3
remote:        https://nameless-garden-54450.herokuapp.com/ deployed to Heroku
remote:
remote: Verifying deploy... done.
To https://git.heroku.com/nameless-garden-54450.git
 * [new branch]      master -> master
(tbot) ~/tbot $
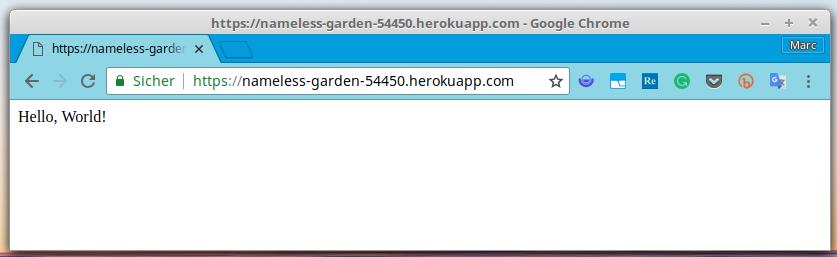
Well, that’s it! When you navigate to the unique URL of your app now, you should see the same Hello, World! like you did when you tested locally before:
It works like a charm! Did you notice we did not even define if we want to build a PHP or Python app yet? Since Heroku has some implemented logic to determine the correct buildpack to run your application, we do not need to define a buildpack manually with this code. A “buildpack” is a script-collection which defines how to prepare and deploy an app and make it running. You can have a look on the buildpacks by browsing Heroku’s Github account and look out for “heroku-buildpack-*” labeled repositories. For example, the one for Python is located here: https://github.com/heroku/heroku-buildpack-python.
If you want to learn more about Heroku’s buildpacks, check out their buildpacks article.
Awesome, isn’t it? I’m thrilled by the simplicity of the system every time I kick off a new app.
There’s more …
I hope I could put fire on your enthusiasm for the platform with this article, too! There are tons of additional features to the platform, like scaling the count of dynos, configuring deployment plans, opening a shell inside the remote containers to do maintenance work like manage.py – tasks, et cetera, et cetera. But since this article has grown longer than I intended it to become, I will do that either “on the fly” during the following parts or write another article with advanced Heroku – topics.
For now, what you have learned during this article gives you just enough knowledge and skill to follow the remaining articles to get your Telegram bot up and running.
Outlook for the next part of the series
We just learned what Heroku is and how one can get started from zero to create and deploy a web-based Flask application and make it available to the world wide web.
In the next article of this series, we will create another application. This time, it will be Django and we will kick it off exactly like we did with this Flask based one and deploy it to Heroku, to make it available as a webhook for your Telegram bot.
If you liked or disliked this article, I’d love to read that in the comments!
Enjoy coding folks!
Born in 1982, Marc Richter is an IT enthusiast since 1994. He became addicted when he first put his hands on their family’s PC and never stopped investigating and exploring new things since then.
He is married to Jennifer and a proud father of two wonderful children.
His current professional focus is DevOps and Python development.
An exhaustive bio can be found in this blog post.