Heroku’s attempt to scare away users and its impact on my Heroku-Fanboy position

Anyone who may have read my past posts on this blog or knows my personal-IT life is most certainly aware of my preference to host personal and pre-MVP projects on Heroku – a formerly great choice for hosting your projects for free.

With Heroku’s most recent decision to drastically change their support for small projects, this has also drastically changed, leaving me disappointed and even in a condition near to mad.

In this article, I will explain what I love so much with Heroku, why it is was my platform of choice for most of my personal projects, what has changed on November 28, 2022, what are my thoughts about this, and what it means for my existing and future projects.

Continue reading “Heroku’s attempt to scare away users and its impact on my Heroku-Fanboy position”

Let’s Encrypt issue “unable to get local issuer certificate” since Nov 24 2020

I just stumbled across an issue with Let’s Encrypt certificates being used on my personal server for securing IMAP and SMTP. I decided to share it here since, in my opinion, it’s a hard to grab nut because I did not really find clear articles pointing this out during my own debugging.

What has happened?

A few days ago, a friend of mine, with who I share my personal Mailserver, contacted me telling me that out of a sudden his Android Mail app (K-9 Mail) stopped working. At the same time, I had no issues with Thunderbird on MacOSX Big Sur, nor Apple Mail on iOS 14.2 nor Roundcube.

Anyways, I started to verify everything: I looked for the state of certificates, from Let’s Encrypt to verify certbot didn’t fail to refresh them, I checked the Dovecot configuration if it is configured to use the appropriate SSL certs, I checked the content of the SSL certs used on the server using OpenSSL (openssl x509 -in certificate.crt -text -noout ); all appeared OK and I had to tell my buddy that I do not have a clue what his issue might be.

Today, I did something that I rarely do: I started my Thunderbird Mail app on my Windows 10 Gaming PC. Since it’s my gaming PC and the only Windows PC I have in use, I didn’t do this in my routine earlier. I noticed that I had zero emails in my Inbox.
That’s not a too uncommon thing, since I do a quite good job at keeping my Inbox clean by sorting read mail into subfolders. But this time, I knew there is mail since I checked on Apple Mail before.

Where are my emails?? 

Now I was able to reproduce it. Again I searched for an issue on my server but – nothing found! Everything seemed correct. Also, I am running the same setup for several years now and didn’t change anything lately; so: why should it break?

The reason

… Maybe I didn’t change anything, but it turned out: Let’s Encrypt did!

This time, I also tried to grab the certificate from “the outside”, using OpenSSL on my Mailserver, but pointing to its official public DNS name instead of checking the cert by its local file:

~ # openssl s_client -connect mail.marc-richter.info:993 -quiet | echo
depth=0 CN = mail.marc-richter.info
verify error:num=20:unable to get local issuer certificate
verify return:1
depth=0 CN = mail.marc-richter.info
verify error:num=21:unable to verify the first certificate
verify return:1
~ #

Aha – the server itself seems to have some trouble with the local copy of the issuer certificate?
I then checked the journald entries:

Dez 21 19:32:56 zzzzz.zen-net.de dovecot[3331742]: imap-login: Disconnected (no auth attempts in 0 secs): user=<>, rip=xxx.xxx.xxx.xxx, lip=yyy.yyy.yyy.yyy, TLS handshaking: SSL_accept() failed: error:14094416:SSL routines:ssl3_read_bytes:sslv3 alert certificate unknown: SSL alert number 46, session=<D1nY...

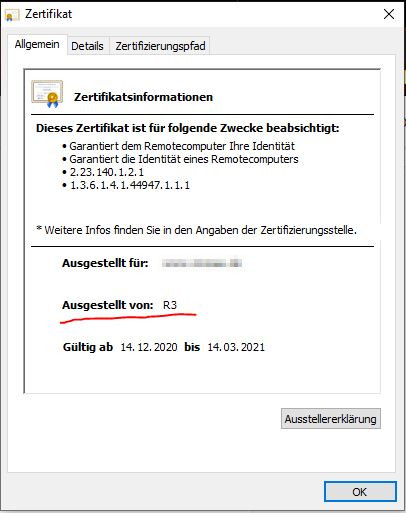
By sheer luck, I found this article in the Let’s Encrypt blog, informing about that they introduced a new intermediate signing instance around November 24th 2020.
I already noted that the certificate issuer in my browser instances now says “R3” for some of my sites instead of “Let’s Encrypt“, but since that worked without any issues, I didn’t pay too much attention. But for some reason, it seems to cause trouble with some IMAP clients / operating system combinations out there.

The solution

For me (Thunderbird on Windows 10), it solved my issue to download and import the R3 intermediate certificate from https://crt.sh/?id=3479778542 (the link they named in their blog post – click on “Certificate”). Out of a sudden, Thunderbird acted as if there hadn’t been an issue before.
You can import that certificate into the Windows certificate store by double-clicking on it. But that’s not enough for Thunderbird: Since it uses its own certificate store, you need to import it to Thunderbird as well:

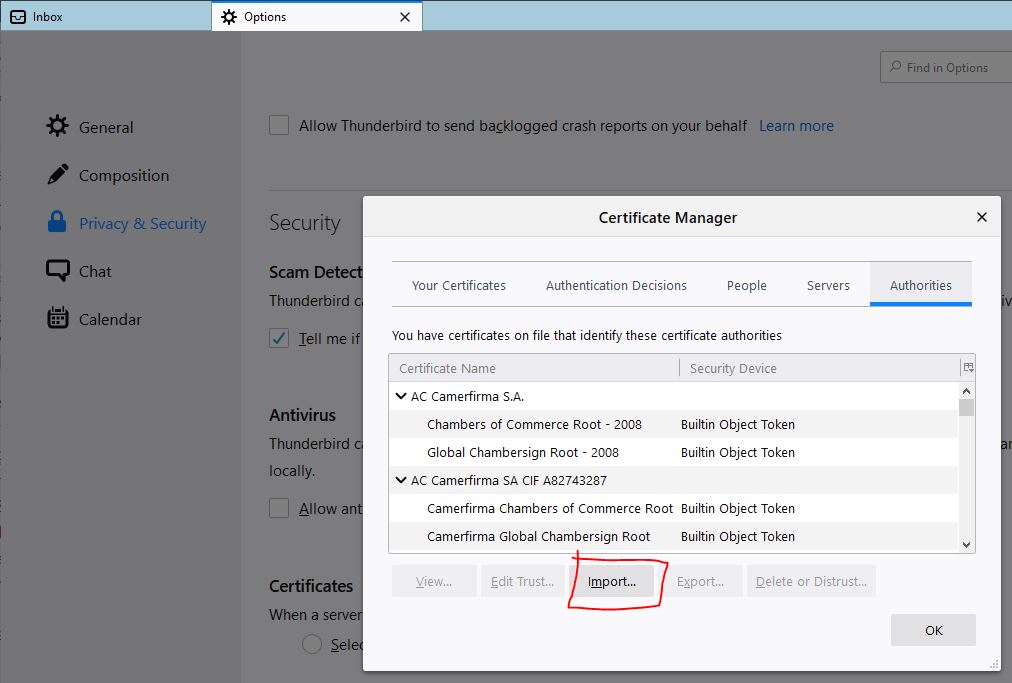
Go to Menu (3 black bars in the upper right corner) -> Options -> Privacy & Security -> Scroll down to “Security” and click “Manage certificates…“. In the “Certificate Manager” dialogue, click “Import …” and select the downloaded *.crt file.

That should do the trick.
I hope this quick-tip saves you some time and headaches.

Create your own Telegram bot with Django on Heroku – Part 11 – Apologies for the long pause! ?

Header Image showing Django, Telegram, Heroku logos
This entry is part 11 of 11 in the series Create your own Telegram bot with Django on Heroku

Django_Pony

⚠️ This article is outdated and discontinued since Heroku decided to no longer offer their free tiers as this article series suggests to use in August, 2022. Please see this post for details. ⚠️

The previous part of this series, in which we created a WebHook for our Telegram – bot, was written on December 5th, 2018. This is more than 20 months now without any update to this series – embarrassing ?. My sincere apologies for this! I had some changes in my job and was quite busy catching up.

This time, I will provide you with only a very (!) short update instead of a real article:
Since I recovered from this changed situation in the meantime, I’m planning to pick up this article series again. Since a lot of time has passed and most certainly even the most devoted readers forgot about the progress in previous parts in the meantime, I decided to add something new: A Git Repository which contains all changes so far, structured by tags that allow finding the proper entry point to the code, depending on which article you are reading, currently.

I hope to make the (re-)entry to the series a bit more easy and attractive by this.
I will also add results of future articles to that repository since I had a hard time why something so obvious came to my mind only so late in the article series …

Please find the Repository on GitHub.

Outlook for the next part of the series

So far, our bot is just capable to receive data. In the next article of this series, we will add a bit more functionality to the bot by adding a reply feature to it. I’m not 100% sure what this will be exactly yet, but I will try to come up with something interesting, educational and useful ?
Also, since this is about to become a bot to store your cash spendings, we will add pattern recognition logic to enable the bot to sum and track your spendings.
Also, when we saw that we ended up with a doubled record in our User table, we realized that the current string representation of the records for that table is not really helpful, displaying the same lines containing “Marc Richter” twice. Having displayed the same name twice made it hard to identify the correct record for deletion. We will change that as well and by that see how to make changes like this to a database that has already records stored to it, using Django’s workflows.

? Enjoy coding! ❤

Using pyenv to manage your Python interpreters

This entry is part 1 of 1 in the series Python version- and module management

When I started to learn Python a few years ago, I often wondered about what’s the “correct” or “best” way to prepare your system’s Python environment for the requirements your software project or some Python-based application you’d like to start using may have: Should I install modules using the package manager of my OS? Or by using Python tools for it like pip? What are “virtual environments” and how do I utilize these for my projects? What’s all this pyenv, pip, pipenv, easy_install, setuptools, anaconda, conda, miniconda …

In this article series, I’d like to introduce the most common tools and techniques on how to do this in the Python world.
At the end of the series, I will share some of my thoughts, doubts, and questions I had back then, tell about some experiences I gathered in the meantime and generally share the outcome of this journey and what my Python-Workflow looks like, nowadays.

Introduction to pyenv ?

This first article is about pyenv, a lightweight, yet powerful, Python version management tool that works in user – scope and does stay out of the way of systems global Python interpreters.

Continue reading “Using pyenv to manage your Python interpreters”

Create your own Telegram bot with Django on Heroku – Part 10 – Creating a view for your bot’s webhook

Header Image showing Django, Telegram, Heroku logos
This entry is part 10 of 11 in the series Create your own Telegram bot with Django on Heroku

Django_Pony

⚠️ This article is outdated and discontinued since Heroku decided to no longer offer their free tiers as this article series suggests to use in August, 2022. Please see this post for details. ⚠️

In the previous part of this series, we created another database model named Message to hold the message-data from our Telegram – bot. I also explained the process of defining a SQL schema using a Django model, what to consider during that phase and how to bring the Django’s model field reference docs to a good use during that process. Last but not least, we learned what a HerokuOne-Off Dyno” is and how it can be used to execute administrative tasks on our production site like applying outstanding migrations to a database.

This time, I will provide you with the last piece of the puzzle to make your bot available to the world. You will learn how to write and wire the Python code to actually use all that we have prepared so far. At the end of this part, your bot will be able to receive and store each message sent to it by registered users. And since it’s already more than a month since I published the previous article in this series, let’s not waste any more time and jump right in!

Continue reading “Create your own Telegram bot with Django on Heroku – Part 10 – Creating a view for your bot’s webhook”

Create your own Telegram bot with Django on Heroku – Part 9 – Creating a model for your messages

Header Image showing Django, Telegram, Heroku logos
This entry is part 9 of 11 in the series Create your own Telegram bot with Django on Heroku

Django_Pony

⚠️ This article is outdated and discontinued since Heroku decided to no longer offer their free tiers as this article series suggests to use in August, 2022. Please see this post for details. ⚠️

In the previous part of this series, I explained what a database is good for in general and Django in special. I also told about what relational database systems (RDBS) are supported by Django, what migrations and models are and how to create and apply them. Further, I introduced and explained what the Django Admin-Backend is and how to use it to create, alter or delete data in tables resulting from having applied the migrations to SQL databases from a model definition.

Today, we will create another database model to hold the message-data forwarded to our webhook by the Telegram – bot in the future. I will try my best to make this a play-along part which invites everyone to follow step by step in another console. Hopefully, it gives you an idea what thoughts and considerations are involved in writing a model for a real-world problem and how to involve Django’s documentation resources.
Continue reading “Create your own Telegram bot with Django on Heroku – Part 9 – Creating a model for your messages”

Create your own Telegram bot with Django on Heroku – Part 8 – Integrating the database

Header Image showing Django, Telegram, Heroku logos
This entry is part 8 of 11 in the series Create your own Telegram bot with Django on Heroku

Django_Pony

⚠️ This article is outdated and discontinued since Heroku decided to no longer offer their free tiers as this article series suggests to use in August, 2022. Please see this post for details. ⚠️

In the previous part of this series, we had a bit of a term definition to make it easier for beginners of Django to understand what I am talking about. Also, we created a Django – App called “bot” and created a URL routing for it to be available at (https://dry-tundra-61874.herokuapp.com)/bot/* (or whatever your URL looks like) and how to direct URLs to a view.

Originally, I planned to also show how to start using a database in Django to hold your bot’s data. But since the article grew larger than I anticipated before, I had to cut that down, unfortunately (sorry for that ?).
Today, I will deliver that part in its own article. We will learn how to work with databases in Django, what migrations are and how to interact with the database from within Django’s Admin-Backend.
Continue reading “Create your own Telegram bot with Django on Heroku – Part 8 – Integrating the database”

Create your own Telegram bot with Django on Heroku – Part 7 – Introducing apps and URLconf

Header Image showing Django, Telegram, Heroku logos
This entry is part 7 of 11 in the series Create your own Telegram bot with Django on Heroku


Django_Pony

⚠️ This article is outdated and discontinued since Heroku decided to no longer offer their free tiers as this article series suggests to use in August, 2022. Please see this post for details. ⚠️

In the previous part of this series, we started with the basics for kicking off a new Django project. We prepared our virtualenv, installed needed modules to it, created and integrated a new Heroku – project for it and learned how to work with variables in Heroku to control our application with an easy example. We also learned how to check our results locally before we publish it to our production space and how we can add an addon to our Heroku project by adding a PostgreSQL database to it.

Today, we will learn what an “app” is in Django and how to create it. Also, we will learn about and create a so-called URLconf / routing to direct specific URLs to specific parts of our code.
Continue reading “Create your own Telegram bot with Django on Heroku – Part 7 – Introducing apps and URLconf”

Create your own Telegram bot with Django on Heroku – Part 6 – Creating the Django app

Header Image showing Django, Telegram, Heroku logos
This entry is part 6 of 11 in the series Create your own Telegram bot with Django on Heroku


Django_Pony

⚠️ This article is outdated and discontinued since Heroku decided to no longer offer their free tiers as this article series suggests to use in August, 2022. Please see this post for details. ⚠️

In the previous part of this series, I tried to give you a brief yet thorough introduction to hosting your projects with Heroku.
That part was special because it was a completely optional part of this series; if you prefer to host your applications on a different platform and skipped that article, I’d like to repeat that this is completely OK and that I had shown nothing you will need for anything different but interacting with Heroku. You will hopefully notice no blank spots in the following articles. There is no need to read that article if you do not plan to use Heroku for hosting your bot. But you should be familiar enough with your hosting solution of choice to adopt the Heroku – commands I show here to an adequate setup for your hosting solution.

Today we will finally start creating our bot with Django. What we did up until now was just some kind of preparation and establishing background. In this part, we will finally start with the real stuff. ?

Continue reading “Create your own Telegram bot with Django on Heroku – Part 6 – Creating the Django app”

Create your own Telegram bot with Django on Heroku – Part 5 – Introduce Heroku

Header Image showing Django, Telegram, Heroku logos
This entry is part 5 of 11 in the series Create your own Telegram bot with Django on Heroku

⚠️ This article is outdated and discontinued since Heroku decided to no longer offer their free tiers as this article series suggests to use in August, 2022. Please see this post for details. ⚠️

In the previous part of this series, I tried to explain the differences in the two modes a Telegram bot supports: pull (getUpdates) and push (Webhook) methods. I also explained what a webhook is and how to easily giving it a test-drive, without any hassle.

Today we will talk about what Heroku is and about how to prepare your workstation to effectively work with that platform.

If you do not like Heroku or if you simply want to use another hosting service for your bot like AWS, OpenShift, Google Cloud Platform, whatever for any reason: That is perfectly OK and you can do so! I will write this and the next article on Heroku in a way that even when you decide to skip it completely, you won’t miss anything from this Telegram/Python/Django article series but the presentation of how to get the bot hosted on Heroku.
The only thing which you won’t be able to follow 1:1 in the upcoming parts of this series is that you can’t use those commands to trigger new deployments to the hosting platform with or do some minor, hosting platform related steps. But if you are advanced and familiar enough with deploying web applications to have a better idea of hosting an application than me, this shouldn’t be much of a problem for you, since most commands for Heroku are pretty straightforward and easy to adapt for a different system.

Continue reading “Create your own Telegram bot with Django on Heroku – Part 5 – Introduce Heroku”