
⚠️ This article is outdated and discontinued since Heroku decided to no longer offer their free tiers as this article series suggests to use in August, 2022. Please see this post for details. ⚠️
In the previous part of this series, I explained what a database is good for in general and Django in special. I also told about what relational database systems (RDBS) are supported by Django, what migrations and models are and how to create and apply them. Further, I introduced and explained what the Django Admin-Backend is and how to use it to create, alter or delete data in tables resulting from having applied the migrations to SQL databases from a model definition.
Today, we will create another database model to hold the message-data forwarded to our webhook by the Telegram – bot in the future. I will try my best to make this a play-along part which invites everyone to follow step by step in another console. Hopefully, it gives you an idea what thoughts and considerations are involved in writing a model for a real-world problem and how to involve Django’s documentation resources.
Er… what did we want to do again?
In case you lost track: Incredible 8 articles ago in Part 1 of this series, I described this article series scope. In case you forgot in the meantime or just want to give it a fresh up in general, please pause here and do so now by reading that part once more.
In Part 3, we investigated the JSON data structure of messages the Telegram bot sends to webhooks. We will work with this data structures in this article, so there will be a natural repetition I guess and we will also explain the details of the fields inside that data structure. But we won’t repeat the general description of it. If you want to know more about this, please revisit that article once more as well.
Preparational thoughts
First, let’s remember what we want to achieve:
We want every registered user to be able to send text messages to our bot. We do not need other message types, like photos, audio or whatever. Messages of a different type/content or from foreign users, we want to not progress or store it any further than dropping it upon receiving.
Valid messages should be stored in our database. These messages should be processed and analyzed for containing some pre-defined pattern (like: “the first non-whitespaced part must be a positive or negative float, followed by any string“).
Let’s look at a typical Telegram message again:
{'message': {'chat': {'first_name': 'Marc',
                      'id': REMOVED,
                      'last_name': 'Richter',
                      'type': 'private'},
             'date': 1533248578,
             'from': {'first_name': 'Marc',
                      'id': REMOVED,
                      'is_bot': False,
                      'language_code': 'de',
                      'last_name': 'Richter'},
             'message_id': 5,
             'text': 'Test2'},
 'update_id': 941430901}
- Each message data structure contains two keys: update_id , which contains an integer and message , which contains everything else.
- update_id is an incrementing number which identifies an “update” uniquely. That means: This can be used to clearly identify any message and if this was already received or not.
⚠ Attention: It might happen that messages reach your bot multiple times (for example, if Telegram could not clearly confirm the message was delivered). It might also happen, that messages arrive at your hook in any order. The later is the reason why dropping messages of a lower update_id than the “highest” which is already in your database might lead to lost messages. Better do not implement a logic like that. ⚠ - While update_id is just a meta information, which helps us to determine if we still need to process that update or not, message contains multiple data elements we want to receive, store and process. It consists of 5 keys:
- text is somewhat obvious: This contains the text of the message.
- message_id contains an integer value, which is unique for the scope of this chat.
- date is also an integer. It marks the date this message was received; more on this in a minute.
- The two remaining structures from and chat mainly contain the same info. Unless you plan to be able to send replies multi-language, you most certainly do not need the value of message[‘from’][‘language_code’] . The same is true for message[‘from’][‘is_bot’] , since we only will process registered IDs anyways. Also, our bot does not work in any multi-user chat, which is why we do not need message[‘chat’][‘type’] either.
Since the rest of the fields are identical, it does not matter which one we use for our code.- first_name and last_name are obvious, I hope.
- id is also an integer, informing about the unique user-id of the sender of the message. This can be used to decide if this was received by one of our registered users or not (I anonymized mine here by replacing it with “REMOVED” as a spam prevention measure).
That’s pretty much it! Having this figured out, we can make up our mind on which of these data we need for doing what in our bot.
The good must be put in the dish,
The bad you may eat if you wish.
In our use case, we do not need every single value of each message. Even though you could, you do not even need to store every single message. In the end, deciding what you want to keep and what not is up to you. For several reasons, it makes sense to limit the amount of data to store, generally:
- Waste just increases the required amount of storage you need for your database.
- The bigger your database, the bigger are your backups, too.
- A bigger database also tends to become slower than slim ones.
- In case of a data leak, the fewer details you stored, the fewer confessions you need to make to have your customer’s private details exposed.
- so many more …
If the previously described pattern is not found, one could argue to not store that message preferably, for formerly mentioned reasons. In the early phase of your project, you should save these anyways, to not risk losing something, if it turns out you forgot to implement a common pattern or your pattern expression doesn’t work as you intended. You can have these be dropped later when your code is recognized mature and stable.
So, let’s have look at the example data-structure and compare that to our initial goal definition:
- update_id is needed since we need to know if we processed the message we received already or not.
- message[‘date’] we also need to tell when a message was received by the Telegram infrastructure; even when that message hits our bot’s webhook at a different time.
- For obvious reasons, we also need the content of a message from message[‘text’] .
- Finally, we need one of message[‘chat’][‘id’] or message[‘from’][‘id’] to tell who we received that message from. It doesn’t matter which one we choose since these are absolutely redundant and always the same.
The rest of that data structure is not needed for our sake.
So, let’s open up our editor and begin creating a model for this. Let’s start with the easy stuff: Defining fields with a matching data type for the four data sources from a Telegram JSON structure we want to store in our database. To do that, have a look at the characteristics of each and read your way through the list of Django’s field types to find the best match to craft that into our model. The following changes need to be applied to bot/models.py file.
update_id
The update_id consists of an integer. The best match in Django’s field typed repertoire is IntegerField. Since no two messages coming from Telegram’s infrastructure, these integers are unique, so we reflect that within our model definition as well:
class Message(models.Model):
    update_id      = models.IntegerField(unique=True)
message[‘text’]
Since we are only interested in text messages, we need a data type, which can store text. Telegram’s messages have a limit of 4096 UTF-8 characters. So, we need something that can store this amount of text.
Crawling through the list of Django’s field types, we will find that there are at least two possible field types for that: CharField and TextField. So – which one to choose?
For the concerns of the database layout, these two are identical. The difference is that they are rendered different by Django: CharField is rendered as a TextInput by default, TextField is rendered as a Textarea. Both field types know the max_length attribute, but only CharField enforces that at the model- and database level. TextField just doesn’t accept larger inputs in the generated form fields (eg. at the admin backend), but from your code, you can add longer texts to the database, since there’s no restriction on the SQL level.
Let’s use TextField for message[‘text’] and define the max_length=4096 attribute for it since, for all that we know, we do not need to expect larger texts coming from Telegram:
class Message(models.Model):
    update_id       = models.IntegerField(unique=True)
    text            = models.TextField(max_length=4096)
message[‘date’]
To store this datatype, we need to understand in what format this is. 1533248578 ; looks more like an integer than a date, isn’t it? You could also make this of type IntegerField again, but that way you need to convert it, again and again, to be able to work with it in your code. But the worst issue with doing so is that Django offers some methods and possibilities for the different data types, you just could not make use of if you do not choose the best matching data type to it in your model’s definition, reflecting the nature of the data best. You can compare this with what is built into Pythons str() or int() – objects:
Technically, you can make 12345 a string and store that object in a variable instead of an integer like this:
my_number = str(12345)
That is perfectly valid code and there’s no such thing like a Python-Police, hindering you to do so – but: Does it make sense? In the majority of cases, the answer is “no”, I think. You can’t use it for math, you can’t say if that is greater or smaller than 5 since you can’t use the comparison operators and so on. But: You can do great things like .upper() to the string “12345” now – impressive, yes? … not really ?
That’s the same with Django’s methods; the better the match is for your data type to the “real world”-meaning of your data, the more useful it will be for your code.
Well – the integer-like value of 1533248578 somehow represents a date – how’s that? In fact, it does not only represents a date but a date and time. It’s known as Unix time, POSIX time, or Unix Epoch time / seconds since the epoch and defines a date and time by the number of seconds passed since 00:00:00 UTC on January 1st, 1970; it’s quite popular in the Unix world, actually.
So: A timestamp of 1533248578 refers to Thu Aug 2 22:22:58 2018 :
>>> from datetime import datetime
>>> print(datetime.utcfromtimestamp(1533248578).strftime('%c'))
Thu Aug  2 22:22:58 2018
Back to our database field type, this means that we need to find a type in Django’s model field type reference which supports dates including time; TimeField? No, no date support. DateField? No support for a time. DateTimeField looks like that’s it! Let’s add that to our model. Since we want to define a default value this time, we also need to add another import for timezone from django.utils to it:
from django.utils import timezone

class Message(models.Model):
    update_id       = models.IntegerField(unique=True)
    text            = models.TextField(max_length=4096)
    date            = models.DateTimeField(default=timezone.now)
message[‘from’][‘id’]
This will be a bit more tricky since we will define this as a so-called “foreign key“. In SQL, this is a field, which uniquely identifies another row in either the same table or another. That’s why each table needs a “primary key“; to have something which allows for a row being identified uniquely since no other row can possibly contain that same criterion. In a customer table, this may be the customer number, for example. It is also possible to declare multiple columns as being a primary key since they are only unique together, for example with a song, which is possibly interpreted by different artists only the combination of “artist” + “song name” are unique.
Back to our application: In the previous part of this article series (Part 8), we already created a User model to hold the Telegram user-id and their names. Since we most certainly want to associate the messages we receive with the names of our registered users, let’s associate the user id with each message’s message[‘from’][‘id’] field with the one from our User model to extract the user details like first- and last name from that; maybe we even add additional details to that table in the future, like an E-Mail- or postal address which then can be associated with each message of the same user-id. Adding a foreign key to our Message model is done using the ForeignKey field type like this:
class Message(models.Model):
    update_id       = models.IntegerField(unique=True)
    text            = models.TextField(max_length=4096)
    date            = models.DateTimeField(default=timezone.now)
    sender          = models.ForeignKey(User)
Also, we need to define what to do with each message if the user they are associated with is deleted from the table of our User model. We have a few choices here, predefined by how SQL works and explained in the “Arguments” section of the ForeignKey field type documentation. Let’s define that all messages which are associated with the deleted user record from the User model are deleted as well by changing the field definition to this:
class Message(models.Model):
    update_id       = models.IntegerField(unique=True)
    text            = models.TextField(max_length=4096)
    date            = models.DateTimeField(default=timezone.now)
    sender          = models.ForeignKey(User, on_delete=models.CASCADE)
Polishing and admin backend registration
Like we did with the User model already, let’s change the way the model’s elements are represented in the admin backend and register the model to the admin backend.
First, change the representation of our model to display our text by overwriting the definition for __str__ like this:
class Message(models.Model):
    update_id       = models.IntegerField(unique=True)
    text            = models.TextField(max_length=4096)
    date            = models.DateTimeField(default=timezone.now)
    sender          = models.ForeignKey(User, on_delete=models.CASCADE)

    def __str__(self):
        return f'{self.text}'
This is our final form of that model definition so far, satisfying all our current needs.
Next, open the file bot/admin.py and make the following changes:
- Add Message to the list of imports from .models like this: from .models import User, Message
- Add the line admin.site.register(Message) to the file.
Now, save everything and let’s head for applying the migrations and double-check the results before with our final step for this article part we will do our deployment to production.
Creating and applying the migrations
Open up a shell, navigate and optionally active your virtualenv for your project and execute python manage.py makemigrations :
(dtbot-hT9CNosh) ~/dtbot $ python manage.py makemigrations
Migrations for 'bot':
  bot/migrations/0002_message.py
    - Create model Message
(dtbot-hT9CNosh) ~/dtbot $
Checking Git what this has caused shows that one migration file was created as desired, apart from which files we have changed manually before:
(dtbot-hT9CNosh) ~/dtbot $ git status -s
 M bot/admin.py
 M bot/models.py
?? bot/migrations/0002_message.py
(dtbot-hT9CNosh) ~/dtbot $
Let’s fire up migrate to have the migrations applied to our database:
(dtbot-hT9CNosh) ~/dtbot $ python manage.py migrate
Operations to perform:
  Apply all migrations: admin, auth, bot, contenttypes, sessions
Running migrations:
  Applying bot.0002_message... OK
(dtbot-hT9CNosh) ~/dtbot $
Our table fits into the SQL architecture like this:

Validating the results in the admin backend, you now should see that “Messages” shows in the “BOT” section and adding a record using the admin backend presents nice rendered fields to manipulate our data in a convenient way:
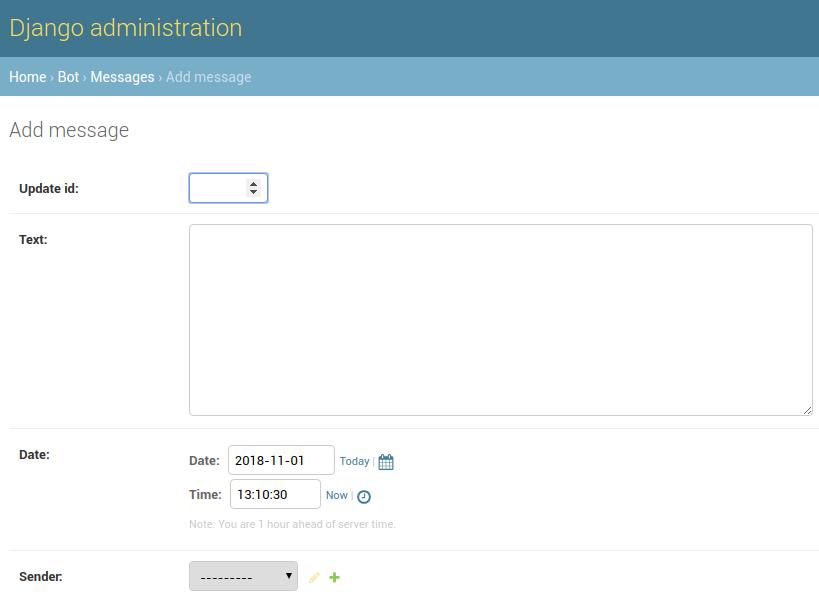
The date and time can be picked using convenient selectors, the up to 4096 characters long text is rendered as a Textarea instead a single-height input field and so on. What’s also pretty interesting: We can make selections for associating users we registered manually already – that might give you a nice idea that what we just tried to achieve does work like a charm! ?
Deploy the changes to production
Using Heroku for our hosting, we have quite a few convenient tools at hands for our hosting. One of them is the ability to connect to our remote production database without needing to add any credentials or recognize names. While in your project folder, simply connect to your production database like this:
(dtbot-hT9CNosh) ~/dtbot $ heroku psql
--> Connecting to postgresql-rectangular-59399
psql (10.5 (Ubuntu 10.5-1.pgdg16.04+1))
SSL connection (protocol: TLSv1.2, cipher: ECDHE-RSA-AES256-GCM-SHA384, bits: 256, compression: off)
Type "help" for help.

dry-tundra-61874::DATABASE=> \dt
Did not find any relations.
dry-tundra-61874::DATABASE=> \q
(dtbot-hT9CNosh) ~/dtbot $
As we can see, there are no tables in our production database yet; fair, since we never applied any migrations to it. Let’s do this now for the first time.
Let’s first deploy our latest files by committing the changes to Git and push the commits to our Heroku remote, triggering a new deployment:
(dtbot-hT9CNosh) ~/dtbot $ git add .
(dtbot-hT9CNosh) ~/dtbot $ git commit -m "Adding a model for Messages"
[master a4de3de] Adding a model for Messages
 3 files changed, 39 insertions(+), 1 deletion(-)
 create mode 100644 bot/migrations/0002_message.py
(dtbot-hT9CNosh) ~/dtbot $ git push heroku master
Counting objects: 26, done.
Delta compression using up to 4 threads.
Compressing objects: 100% (25/25), done.
Writing objects: 100% (26/26), 6.11 KiB | 0 bytes/s, done.
Total 26 (delta 7), reused 0 (delta 0)
remote: Compressing source files... done.
remote: Building source:
remote:
remote: -----> Python app detected
remote:        Using supported version of Python 3.6 (python-3.6.6)
remote: -----> Installing pip
remote: -----> Installing dependencies with Pipenv 2018.5.18…
remote:        Installing dependencies from Pipfile.lock (ce9952)…
remote: -----> $ python manage.py collectstatic --noinput
remote:        /app/.heroku/python/lib/python3.6/site-packages/psycopg2/__init__.py:144: UserWarning: The psycopg2 wheel package will be renamed from release 2.8; in order to keep installing from binary please use "pip install psycopg2-binary" instead. For details see: <http://initd.org/psycopg/docs/install.html#binary-install-from-pypi>.
remote:          """)
remote:        119 static files copied to '/tmp/build_751be55058319d19a3d47547d1362ed8/staticfiles', 362 post-processed.
remote:
remote: -----> Discovering process types
remote:        Procfile declares types -> web
remote:
remote: -----> Compressing...
remote:        Done: 65.3M
remote: -----> Launching...
remote:        Released v12
remote:        https://dry-tundra-61874.herokuapp.com/ deployed to Heroku
remote:
remote: Verifying deploy... done.
To https://git.heroku.com/dry-tundra-61874.git
   2d16fea..a4de3de  master -> master
(dtbot-hT9CNosh) ~/dtbot $
That’s it! Our files are deployed, but still, that does not apply any migration to our database. Let’s do that as a final step for this part of the series.
Applying migrations to our production environment
Basically, you can execute any command you wish using the way I’m about to show you now; this time, we will apply our migrations to the production database. We will do that using a so-called “One-Off Dyno” with our Heroku account.
Unlike the regular dynos which are part of the dyno formation defined by the Procfile to operate our app’s regular business, One-Off Dynos do only have a limited life-span to execute specific administrative or maintenance tasks and are deleted upon logout again, leaving behind nothing but the permanent changes to the database or similar resources.
You are creating and logging in to them in one easy step:
(dtbot-hT9CNosh) ~/dtbot $ heroku run bash
Running bash on ⬢ dry-tundra-61874... up, run.1913 (Free)
~ $ hostname
0d532a3e-d79a-4314-9ad3-6e33f99f5b68
~ $ pwd
/app
~ $ ls -al
total 68
drwx------  7 u40905 dyno  4096 Nov  1 13:47 .
drwxr-xr-x 15 root   root  4096 Oct 29 15:35 ..
drwx------  4 u40905 dyno  4096 Nov  1 13:32 bot
drwx------  3 u40905 dyno  4096 Nov  1 13:32 dtbot
-rw-------  1 u40905 dyno    63 Nov  1 13:32 .gitignore
drwx------  4 u40905 dyno  4096 Nov  1 13:32 .heroku
-rwx------  1 u40905 dyno   537 Nov  1 13:32 manage.py
-rw-------  1 u40905 dyno   241 Nov  1 13:32 Pipfile
-rw-------  1 u40905 dyno 15659 Nov  1 13:32 Pipfile.lock
-rw-------  1 u40905 dyno    25 Nov  1 13:32 Procfile
drwx------  2 u40905 dyno  4096 Nov  1 13:32 .profile.d
-rw-------  1 u40905 dyno   291 Nov  1 13:32 requirements.txt
-rw-------  1 u40905 dyno    12 Nov  1 13:32 runtime.txt
drwx------  3 u40905 dyno  4096 Nov  1 13:32 staticfiles
~ $ python manage.py showmigrations
admin
 [ ] 0001_initial
 [ ] 0002_logentry_remove_auto_add
 [ ] 0003_logentry_add_action_flag_choices
auth
 [ ] 0001_initial
 [ ] 0002_alter_permission_name_max_length
 [ ] 0003_alter_user_email_max_length
 [ ] 0004_alter_user_username_opts
 [ ] 0005_alter_user_last_login_null
 [ ] 0006_require_contenttypes_0002
 [ ] 0007_alter_validators_add_error_messages
 [ ] 0008_alter_user_username_max_length
 [ ] 0009_alter_user_last_name_max_length
bot
 [ ] 0001_initial
 [ ] 0002_message
contenttypes
 [ ] 0001_initial
 [ ] 0002_remove_content_type_name
sessions
 [ ] 0001_initial
~ $
Awesome, isn’t it? We created and logged into a remote server-like environment, which only lives to fulfill a small task and after that will be deleted again with nothing left of it, without the need to care for login-security or doing anything manually. If we would logout of that now (Ctrl+d or typing “exit”, Enter), nothing would have changed; we only issued read operations. If your app would be operating in production already, this additional system would not affect it in any way. It would neither slow down your app by consuming resources like I/O or CPU, nor being unavailable for a few seconds or something for any reasons. If you would manipulate the database or destroy it, that would affect the production site for obvious reasons.
For now, imagine you just had the same database configured on a second instance of your code, just like you had these credentials entered into the local copy on your workstation.
Let’s initiate the database for Django, apply all outstanding migrations and create a superuser for it:
~ $ python manage.py migrate
Operations to perform:
  Apply all migrations: admin, auth, bot, contenttypes, sessions
Running migrations:
  Applying contenttypes.0001_initial... OK
  Applying auth.0001_initial... OK
  Applying admin.0001_initial... OK
  Applying admin.0002_logentry_remove_auto_add... OK
  Applying admin.0003_logentry_add_action_flag_choices... OK
  Applying contenttypes.0002_remove_content_type_name... OK
  Applying auth.0002_alter_permission_name_max_length... OK
  Applying auth.0003_alter_user_email_max_length... OK
  Applying auth.0004_alter_user_username_opts... OK
  Applying auth.0005_alter_user_last_login_null... OK
  Applying auth.0006_require_contenttypes_0002... OK
  Applying auth.0007_alter_validators_add_error_messages... OK
  Applying auth.0008_alter_user_username_max_length... OK
  Applying auth.0009_alter_user_last_name_max_length... OK
  Applying bot.0001_initial... OK
  Applying bot.0002_message... OK
  Applying sessions.0001_initial... OK
~ $ python manage.py createsuperuser
Username (leave blank to use 'u3090'): mrichter
Email address: [email protected]
Password:
Password (again):
Superuser created successfully.
~ $
Let’s see if that did anything to our database. Logout from that One-Off Dyno and reconnect to the remote PostgreSQL database ?:
~ $ exit
(dtbot-hT9CNosh) ~/dtbot $ heroku psql
--> Connecting to postgresql-rectangular-59399
psql (10.5 (Ubuntu 10.5-1.pgdg16.04+1))
SSL connection (protocol: TLSv1.2, cipher: ECDHE-RSA-AES256-GCM-SHA384, bits: 256, compression: off)
Type "help" for help.

dry-tundra-61874::DATABASE=> \dt
                      List of relations
 Schema |            Name            | Type  |     Owner
--------+----------------------------+-------+----------------
 public | auth_group                 | table | gtdekhubrisukx
 public | auth_group_permissions     | table | gtdekhubrisukx
 public | auth_permission            | table | gtdekhubrisukx
 public | auth_user                  | table | gtdekhubrisukx
 public | auth_user_groups           | table | gtdekhubrisukx
 public | auth_user_user_permissions | table | gtdekhubrisukx
 public | bot_message                | table | gtdekhubrisukx
 public | bot_user                   | table | gtdekhubrisukx
 public | django_admin_log           | table | gtdekhubrisukx
 public | django_content_type        | table | gtdekhubrisukx
 public | django_migrations          | table | gtdekhubrisukx
 public | django_session             | table | gtdekhubrisukx
(12 rows)

dry-tundra-61874::DATABASE=>
BAAM; there they are: Our precious tables! ?
This out of the way, nothing should prevent us from login into the admin backend using the credentials of the superuser we just created. As a shortcut: Execute heroku apps:open . That should spawn a browser and navigate it directly to your application’s site without the need to recognize anything.
Outlook for the next part of the series
You just learned how to craft models tailored for your use-case and how to deploy and apply these to your Heroku remote production environment. Also, you saw a few more handy heroku command-line client commands and learned how to make use of them for your development.
In the next article of this series, we will create a view which receives, filters and stores that messages in the database and a URLconf to expose that view, serving as an interface to provide to your Telegram bot as it’s webhook.
That means, that by the end of that part, our Telegram bot will be ready to be launched in production and already receive any amount of messages you and trustworthy users will send to it. ?
If you liked or disliked this article, I’d love to read that in the comments!
? Enjoy coding! ❤
Born in 1982, Marc Richter is an IT enthusiast since 1994. He became addicted when he first put his hands on their family’s PC and never stopped investigating and exploring new things since then.
He is married to Jennifer and a proud father of two wonderful children.
His current professional focus is DevOps and Python development.
An exhaustive bio can be found in this blog post.